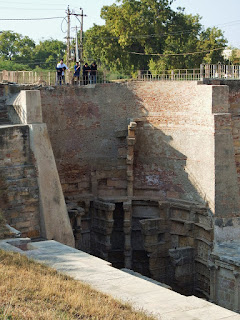
A quick anatomy lesson...
...anatomy that is, of an 11th century step well in India.
In this case, Rani-ki-vav (the Queen's Stepwell) at Patan, Gujarat, India, built about 1050.
(yes, 1100 years ago !!)
So, this will take a little explanation. Look to the far end of this "pit", you will see a well shaft. I suspect that the beginning of the construction of a step well is to first construct the "well".
The shaft at this site is 30m (98 ft) deep, so it can reach ground water in the dry season, and 10m (32 ft) in diameter. It's lined in stone, to keep the surrounding soil from collapsing into the hole. But, as you can imagine, it would be tough for a woman let's say, to lower a rope and bucket 30m into the ground and then pull it back to the top, so they came up with a better idea.
The bricks and smaller smooth stones at the top of the shaft are stones that modern archaeologists used to rebuild portions of the well that had collapsed years ago. They take the place of original stones that were much more ornately carved, many of which had been removed from the site years earlier. The original upper portions of the site (the well and the sides of the step area) had collapsed into the well and so, many stones were taken to build other structures in the area.
Not only is the detail and intricacy of these carvings amazing (this one is about 1m x 0.7m), the number of them is astounding. All the surfaces you can see of the original structure are covered with them.
So, now for the "steps". Imagine that you would like to make some steps down to the water level, which during the dry season, is way down at the bottom of the well shaft. So, instead of building a smooth brick wall for the entire well-shaft, let's say on the East side of the shaft, starting a few feet up from the bottom, you build a few "Roman-looking" arched doors into the wall of the shaft, one above the other, up the East side of the well shaft (which you can't see in these photos, but will be clear in the next post, with photos taken at a fully-intact well).
Then, you back up a calculated distance to the East, and you start digging a trench, with a bottom that slopes downward, toward the bottom of the well shaft, with an angle similar to the angle of steps. Walk down the steps until you get to water, and at the bottom levels, you can walk all the way until you reach the "Roman-like" arched doors, and look down into the bottom of the well shaft.
The angle that steps take needs to have a "rise/run" (sorry for the math) that is less than 1, or the step angle is too steep. So let's say the angle is 0.5/1, you wind up with a 200m long trench with steps reaching down to the 100m level. But we must remember, this is a trench in possibly loose soil, so we need stone walls to keep the soil from collapsing back in. We also must support the walls of the trench to keep them from falling inward. What better force to provide support than the opposite wall. So "beams" span from wall to wall at multiple levels, to keep the walls straight. These "beams" are supported by columns, in the above photo, you are looking through the several rows of beams/columns.
...with a section of open wall, between each "stack" of columns/beams,
all, i man all, ornately carved.
...beautifully...
Here, I've gone down about a third of the way and turned to look back up the steps. Our feet are on top of the lowest "beam" in each stack, and we are walking beneath a higher and higher stack of beams/columns are we go further into the trench, and further down the steps.
Everything, walls, beams, columns...all intricately carved.
At this site, since the upper portions were collapsing, they don't let you go all the way down to the bottom, could still be unstable. Here we are looking through supports that are 3-4 levels up from the very bottom.
In the monsoon season, the ground-water level rises until the entire trench is nearly full, so you might only go down a couple of steps before your feet are wet. As the season gets drier, you must walk further and further down the steps, until at the height of the dry season, you walk basically all the way to the bottom.
Many years ago, a nearby river flooded it's banks, silting up the well and step area, contributing to the collapse, and obscuring the site for many years. Recently, the soil on top has been pulled back, the silt removed from the "trench" and the area made into a national-park-like site maintained by Heritage India so folks can come visit.
Quite cool !
Next, a slightly smaller, but completely intact well, also near Ahmadabad.
These sites are not necessarily "remote" but they are outside the town, and not at all easy to find, unless you have a "secret weapon", which for me is Friends (patient friends that will take time to guide you around, and put up with my slow walking, focusing, clicking...).
Y'all take care,
- Mark
Rani-ki-vav
(the Queen's Stepwell) at Patan, Gujarat, India. Built about 1050.
Address: Near Patan Patola Heritage
Museum, Mohan Nagar Socity, Patan, Gujarat 384265
The fourth
level is the deepest and leads into a rectangular tank of 9.5 by 9.4 metres, at
a depth of 23 metres. The well is located at the westernmost end of the
property and consists of a shaft, 10 metres in diameter and 30 metres deep.


No comments:
Post a Comment